
Think-a-Dot
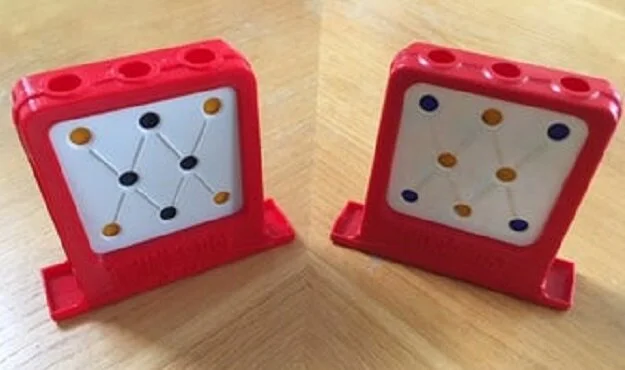
On the left is my Think-a-Dot replica and on the right the original I based it on.
Manufactured By: E.S.R., Inc.
Designed By: Joseph A. Weisbecker
Release Date: 1966
Think-a-Dot has an upright frame with eight dots on the front face, in rows of three, two, and three. The dots are one of two colors, blue and yellow by convention, that indicate the state of a flip-flop gate inside the frame. There are three openings in the top of the unit through which marbles can be dropped. When a marble travelling through the game encounters a gate, it will both flip the state of the gate (changing it's color), and be deflected to the left or right depending on the initial state of the gate. Marbles drop to the bottom of the frame and are collected in side pockets to be reused.
You reset the game to one of two starting positions by tilting the frame to the right or left, so that all the gates face the same way. The four corner gates are colored differently so that they will always be the opposite color of the rest of the dots. Given a particular target pattern of dots, the goal is to drop marbles into the holes at the top until the target pattern is reached in as few moves as possible.
I began my quest to find more 60s toy computers by looking at other E.S.R., Inc. offerings. In addition to the Digi-Comp I, E.S.R. sold three additional products: Think-a-Dot, The Amazing Dr. Nim, and Digi-Comp II. Of the three the Think-a-Dot looked like it might be the easiest to replicate. In addition I was able to get my hands on an original Think-a-Dot as a reference at a reasonable price.
So I was going to make a Think-a-Dot reproduction, but at this point I had no experience with 3D modelling software. After doing a bit of research I decided to try Tinkercad, a free-of-charge, online 3D modeling program that runs in a web browser. It turned out to be a great first choice. Using Tinkercad was a very organic experience and it felt more like sculpting to me than 3D design.
So Think-a-Dot was modeled completely with Tinkercad. I tell people that I did the modelling with digital calipers, Tinkercad, and patience. This was the only reproduction that I made for which I had an original model to base it on. I thoroughly enjoyed the whole process. To be clear, I hesitate to call what I did design. The real design work happened back in the mid 60's.
For my first substantial modelling effort I was really happy with the result. I posted the STL files and build instructions to Thingiverse. Of course, I was very excited. I was going in every day and looking at the number of views, to see what the take up was. And all of a sudden, the number of views took off. I was trying to figure out what was going on. I discovered that one of the reasons was that Adafruit, which has a weekly 3D printer podcast, included it as one of the “prints of the week". The other reason was that I got mentioned on Boing Boing! Given this apparent interest in these vintage toys I was now more determined than ever to carry on with my quest to bring more of them back into the spotlight.
Build Instructions

hackaday.io

Boing Boing